Monday, February 27, 2012

Wow... February is almost over!

Where did the time go?
I've had the most amazing time with you all this month, 3 classes and each one so differnt and amazing!

First thing first for those of you who had the SOUP and convinced me to type it up,
here's the recipe!

Julie’s Creamy Chicken wild rice soup

Ingredients:

2 boxes of Uncle Ben’s rice prepared w-out oil 

15 baby carrots

3 stalks celery

 8 mushrooms

4 garlic cloves

1 large onion

2 tbsp. olive oil 

10 chicken tenderloins

2 tbsp. olive oil 

4 cups Chicken broth (used Better then Bouillon) 

5 Tbs butter

1Tbs oil

½ cup Flour 

4 cups 1% milk

2 tsp. Tarragon

1 tsp. Thyme

1 to 2 tsp. Garlic powder

½ tsp. kosher salt

Cracked pepper


*Start rice.  (Don’t overcook)

*Dice very small all the veggies.  Sauté in oil till soft set aside.  

*Cube chicken -sauté in oil salt and pepper just till done set aside.

*in a sauté pan melt butter and oil whisk in flour cook 3 min add milk and spices cook for 3 min

Whisking to prevent lumps

*Add chicken broth and veggies to rice stir, then add cream mix, bring to boil reduce heat to simmer taste and check seasonings.  Add chicken before serving.
Serve with Fresh and Easy rosemary rolls!

Here's one of the cards I made using the new Apothecary Art set!
Funny how I can spell APOTHECARY now. Stampin'Up! They're so good and they teach you to spell words you never used before!!

Here's one of the last group of ladies:
Here's a litte English tea!
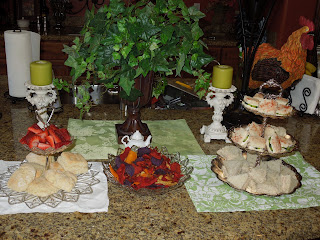
I'm so blessed to have the women I have! Each class has been such a blessing looking forward to the next one!
God Bless, Julie

Wednesday, February 22, 2012

Apothecary art!

I have really loved Stampin' Up's new product line!  They make it easy to make a beautiful card!
Here's one of the cards we made today in the first of three classes!
I had such a sweet day with the women who came today this was one of their favorites!
We used the new riding hood red pleated ribbon!  It's a real show stopper!
Happy stampin!
 Love, Julie

Tuesday, February 14, 2012

Happy Valentine's Day!!!

These were the Valentines I made for my family!!
  I am seriously inspired by the Everyday Enchantment
DSP we are giving away for Sale-a-bration!!
It’s probably the most perfect paper ever!
We are giving away those designer frames embossing folders too!

And the Labels Collection Framelets seriously!!!
I'm in love!


I pray this day you give love, undeserved, and crazy!

Love, Julie

Salted caramel brownies Cooking light

Ingredients

·         Brownies:

·         3 19/50 ounces all-purpose flour (about 3/4 cup)

·         1 cup granulated sugar

·         3/4 cup unsweetened cocoa

·         1/2 cup packed brown sugar

·         1/2 teaspoon baking powder

·         6 tablespoons butter, melted

·         2 large eggs

·         1 teaspoon vanilla extract

·         Cooking spray
·         Topping:

·         1/4 cup butter

·         1/4 cup packed brown sugar

·         3 1/2 tablespoons evaporated fat-free milk, divided

·         1/4 teaspoon vanilla extract

·         1/2 cup powdered sugar

·         1 ounce bittersweet chocolate, coarsely chopped

·         1/8 teaspoon coarse sea salt

Preparation

·         1. Preheat oven to 350°.

·         2. To prepare brownies, weigh or lightly spoon flour into dry measuring cups; level with a knife. Combine flour and next 4 ingredients (through baking powder) in a large bowl, stirring well with a whisk. Combine 6 tablespoons butter, eggs, and 1 teaspoon vanilla. Add butter mixture to flour mixture; stir to combine. Scrape batter into a 9-inch square metal baking pan lightly coated with cooking spray. Bake at 350° for 19 minutes or until a wooden pick inserted in center comes out with moist crumbs clinging. Cool in pan on a wire rack.

·         3. To prepare topping, melt 1/4 cup butter in a saucepan over medium heat. Add 1/4 cup brown sugar and 1 1/2 tablespoons milk; cook 2 minutes. Remove from heat. Add vanilla and powdered sugar; stir with a whisk until smooth. Spread mixture evenly over cooled brownies. Let stand 20 minutes or until set.

·         4. Combine 2 tablespoons milk and chocolate in a microwave-safe bowl; microwave at HIGH for 45 seconds or until melted, stirring after 20 seconds. Stir just until smooth; drizzle over caramel. Sprinkle with sea salt; let stand until set. Cut into squares.


Monday, February 13, 2012

Valentines countdown #5

We are almost there!!!
So here's another gift I made for my ladies!
What a clever idea I hade to pop a window in the mini box!
(if I do say so myself)

I have really loved using the Framelits Dies!
I will confess to using the perfect button even if it's not ours!!


I happen to love these ladies!!
Here's where to learn how:
http://www.ourbestbites.com/2011/02/tutorial-valentines-day-lovebug-cookies/
Happy Stampin,Crafting and or baking!
Love you crazy!
Julie

Sunday, February 12, 2012

Valentine countdown #4


Here’s a little something for Eye Candy!

I love Presents!!!!

My sweet friend Lynne made me this amazing 3 tier treat holder! I wish I lived in a country cottage in the woods where I could leave it out all year!  She makes me want to move! (Okay never mind I just visualized all the work)


Okay here's the Card for today!
Actually it's a date book but it would also be an amazing card!  I was inspired by Kristina Werner!

I made this with using the word LOVE on the flags it's so perfect but I sent it in the mail before I took a picture!!!
I hacked up the I Love Love wheel and now I have a million of the
 most perfect words!!!
So since we are talking about eye candy today here's a picture of two Cakes I made on  Thursday for a couple of sweet twin girls!!

 
Who would have thought to pile mini cupcakes on the cake?  Me and Maybe Buddy Velastro, although I think I came up with it first!  I googled it and no pictures exist!  Maybe my greatest idea yet!!!
Seriously remember that frosting recipe here it is in the flesh!!
Love and Happy Almost Valentines Day!!!
Julie

Saturday, February 11, 2012

Valentine countdown #3


So here’s more of a project but when something is so

stinking cute ya gotta post it!

I made these for my Class it was their gift for attending!

 (they always get one I can't help my self)


Set: P.S. I love you


I will fit anything in our perfect  Cellophane bags!

Still orderable # 124134 and only 2.50 for 50 of them

Feel my love, Julie

The recipe for the day!

Cheesecake Stuffed Strawberries
Here's what you need:
About 20 strawberries... this was a little over one carton for me.
8 oz pkg softened cream cheese
1/2 cup powdered sugar
1/2 tsp vanilla
1 sleeve of graham crackers
1/2 cup mini chocolate chips (optional)

Directions:
1. Rinse strawberries and cut around the top of the strawberry. Remove the top and clean out with a paring knife, if necessary (some may already be hollow inside). Prep all strawberries and set aside.
2. In a mixing bowl, beat cream cheese, powdered sugar, and vanilla until creamy. Add cream cheese mix to a piping bag or ziploc with the corner snipped off. Fill strawberries with cheesecake mixture. Once strawberries are filled, dip the top in graham cracker crumbs. If not serving immediately, refrigerate until serving.

Friday, February 10, 2012

Valentine countdown #2


This card is super shimmery it’s embossed in
Iridescent Ice, and then I added Dazzling Diamonds
around the whole heart!

I love that it’s a gate fold; it adds a little something special to it!

Set: You Are Loved! One of those sets you were supposed to get before the Holiday Mini went away! Lets Pray SU! Brings it back in the big catalog!!
I love our new pleated ribbon, it's so easy to use!!
Be inspired to create a little crafty love in your home!

Oh you could make these if your bored!!

Bon Apetite Caramel-Dark Chocolate Truffles with Fleur de Sel
  • 20 ounces bittersweet or semisweet chocolate, finely chopped, divided
  • 1/3 cup sugar
  • 2 tablespoons water
  • 2/3 cup whipping cream
  • 1/4 teaspoon fleur de sel
  • 1/2 cup unsweetened cocoa powder
  • Additional fleur de sel 
  • Preparation

Place 8 ounces chocolate in metal bowl over saucepan of barely simmering water (do not allow bottom of bowl to touch water); stir until chocolate is smooth. Remove chocolate from over water.

Combine sugar and 2 tablespoons water in small saucepan. Stir over medium heat until sugar dissolves, occasionally brushing sides of pan with wet pastry brush. Increase heat; boil until syrup is deep amber color, brushing down sides and swirling pan occasionally, about 4 minutes. Add cream (mixture will bubble). Stir over very low heat until caramel is smooth. Mix caramel and 1/4 teaspoon fleur de sel into melted chocolate. Chill until truffle filling is firm, at least 3 hours.

Place cocoa in bowl. Using 1 tablespoon truffle filling for each truffle, roll into balls, then roll in cocoa. Arrange on baking sheet. Cover; chill overnight.

Line 13x9x2-inch baking sheet with foil. Place remaining 12 ounces chocolate in medium metal bowl over saucepan of barely simmering water (do not allow bottom of bowl to touch water); stir until chocolate is melted and smooth and thermometer inserted into chocolate registers 115°F. Remove bowl from over water. Working quickly, submerge 1 truffle in melted chocolate. Using fork, lift out truffle and tap fork against side of bowl to allow excess coating to drip off. Transfer truffle to prepared sheet. Repeat with remaining truffles. Sprinkle truffles lightly with additional fleur de sel. Let stand until coating sets, at least 1 hour. (Can be made 1 week ahead. Cover and chill. Bring to room temperature before serving.)
Love and Blessings, Julie


Thursday, February 9, 2012

Valentine countdown #1 !


Valentines is fast approaching so I’m going to post a card a day till we get there!

Especially since I love Valentine’s Day and I love hearts and I can’t get enough of them!!

Here’s one of my favorites!


I love how this card turned out!  Do you realize that you can color our pearls and make them any color? Simply use a Sharpie marker!!

Set: Sweet Cake, page 33 in the Occasions Mini Catalog!

I also used the letter press plate Lots of Love Page 217 in the Main Catalog!


And just because it's Valentines weekend, and because i'm a little evil, and because it's that good!!!

 I thought I'd share my Favorite frosting!


Country Living's Cooked Chocolate frosting!


·         1 cup milk

·         3 tablespoons flour

·         1/8 teaspoons salt

·         8 ounces of  62 percent dark chocolate

(I used a Giant Bar of Trader Joes Dark choc 71%)

·         1 cup (2 sticks) butter

·         1 1/2 cups confectioners' sugar

·         2 tablespoons cocoa,

·         1 teaspoons vanilla extract


Directions

1.       Whisk 1 cup milk, 3 tablespoons flour, and 18 teaspoon salt in a small saucepan over medium heat until the mixture thickens and begins to bubble -- 1 to 2 minutes. Transfer to a small bowl and let cool.

2.      Melt 8 ounces of either 62 percent dark chocolate. Set aside to cool.

3.      Beat 1 cup butter, 1 1/2 cups confectioners' sugar, and 2 tablespoons cocoa chocolate together until light and fluffy. Beat in the cooled chocolate and add milk mixture

4.     Add 1 teaspoon vanilla extract (until smooth and fluffy. Use immediately.
5. Make sure to get it all over your fingers so you'll be forced to lick them!
Happy Stamping, Crafting, and baking!
Love you, Julie